Thanks to everyone for the comments last week, and for the insight as to what the special shrub I posted could be. If you missed it, go here and if you know what it is please let me know. Some said it could be a honeysuckle and someone also mentioned it could be abelia. So far none of the photos of either of these looked quite like mine (at least on google). So further research needs to be done.
For T Stands For Tuesday with Bleubeard and Elizabeth I have two special things to share. First of all I want to thank Darla who last week posted such a beautiful photo she had taken of wetlands. I commented that it would make a beautiful painting as well. Couldn't get it off my mind so naturally I painted it in my journal. (Click on "Darla" to take you to her photo-and do take a moment to leave her a comment).
This is the finished page:
Wetlands
I knew I wanted to approach this in the wabi-sabi way as in Serena Barton's fabulous book ( yes, I've referred to her and her book many times since its release:)! So I began my page with textures:
I gave the pg. a coat of gesso then used a combination of embossing paste and torn bits of handmade textured paper. The colors were all made by using Serena's reinker glaze formula. Before the glazes were dry I used the point of a tiny scissor and incised to mimic the shape of the grasses. Here is a close up of the detail:
Over the weekend hubby and I took a drive on a gorgeous day. On the way home we stopped in a nearby town to browse thru the Zionsville Antiques mall. It was huge-with lots of booths so it took quite awhile to go through. No, I didn't purchase anything. However, look what I found to share with my "T" friends:
Teapot Chimes!
I'd never seen anything like them before-made from vintage sterling silver teapots and silverware. Quite unique but not for me-and they were quite pricey too.
One final art page from my journal. This time it is another abstract painting. The inspiration came from study 40 practice from the book "Abstracts 50 Inspirational Projects" by Rolina van Vliet. I find it an excellent source for understanding color, shape, theory,composition, style, etc. etc. It began on this page which already had gelli printed deli paper strips glued on:
I chose to flip it horizontally, then cut out basic cup and pitcher shapes from more gelli print papers and played with the arrangement on my page:
Once happy with it I glued down the pieces and lined them with a charcoal pencil. And this is the finished result:
Abstract Still Life
I'm linking to Art Journal Every Day, Inspiration Avenue (theme is "show and tell"), Mix it Monthly (theme is "still life". New theme coming for November so do check it out!) and of course my peeps at Paint Party Friday.
For those of you celebrating Halloween and Trick Or Treat I wish you nothing but ghoulish fun and lots of treats!
Leaving you today with a quote about wabi-sabi art. I love this one.
" Pare down to the essence, but don't remove the poetry." Leonard Loren
Monday, October 27, 2014
Thursday, October 23, 2014
From Abstract To Folksy
Most of the time the art I create runs the gamut, depending on the mood I'm in or what inspires me. I certainly do have my favorites but it's stimulating and refreshing to work with various art styles. How about you?
Deep in the Birches Abstract
In last Friday's post I mentioned getting over my fear of black. It wasn't so bad and now I find myself even drawn to working from a black background:) I began this journal page by painting black acrylic paint along with some Golden Paynes Gray and Permanent Violet Dark fluid acrylics. Several flat brushes were used with diluted grey and sand acrylic paints to drip and brush lines. I then scratched into the "trunks" to resemble the marks on a birch tree. You can click on it to get a larger view. Linking to Art Journal Every Day; Paint Party Friday; and Art Journal Journey (theme is "Deep in the Forest").
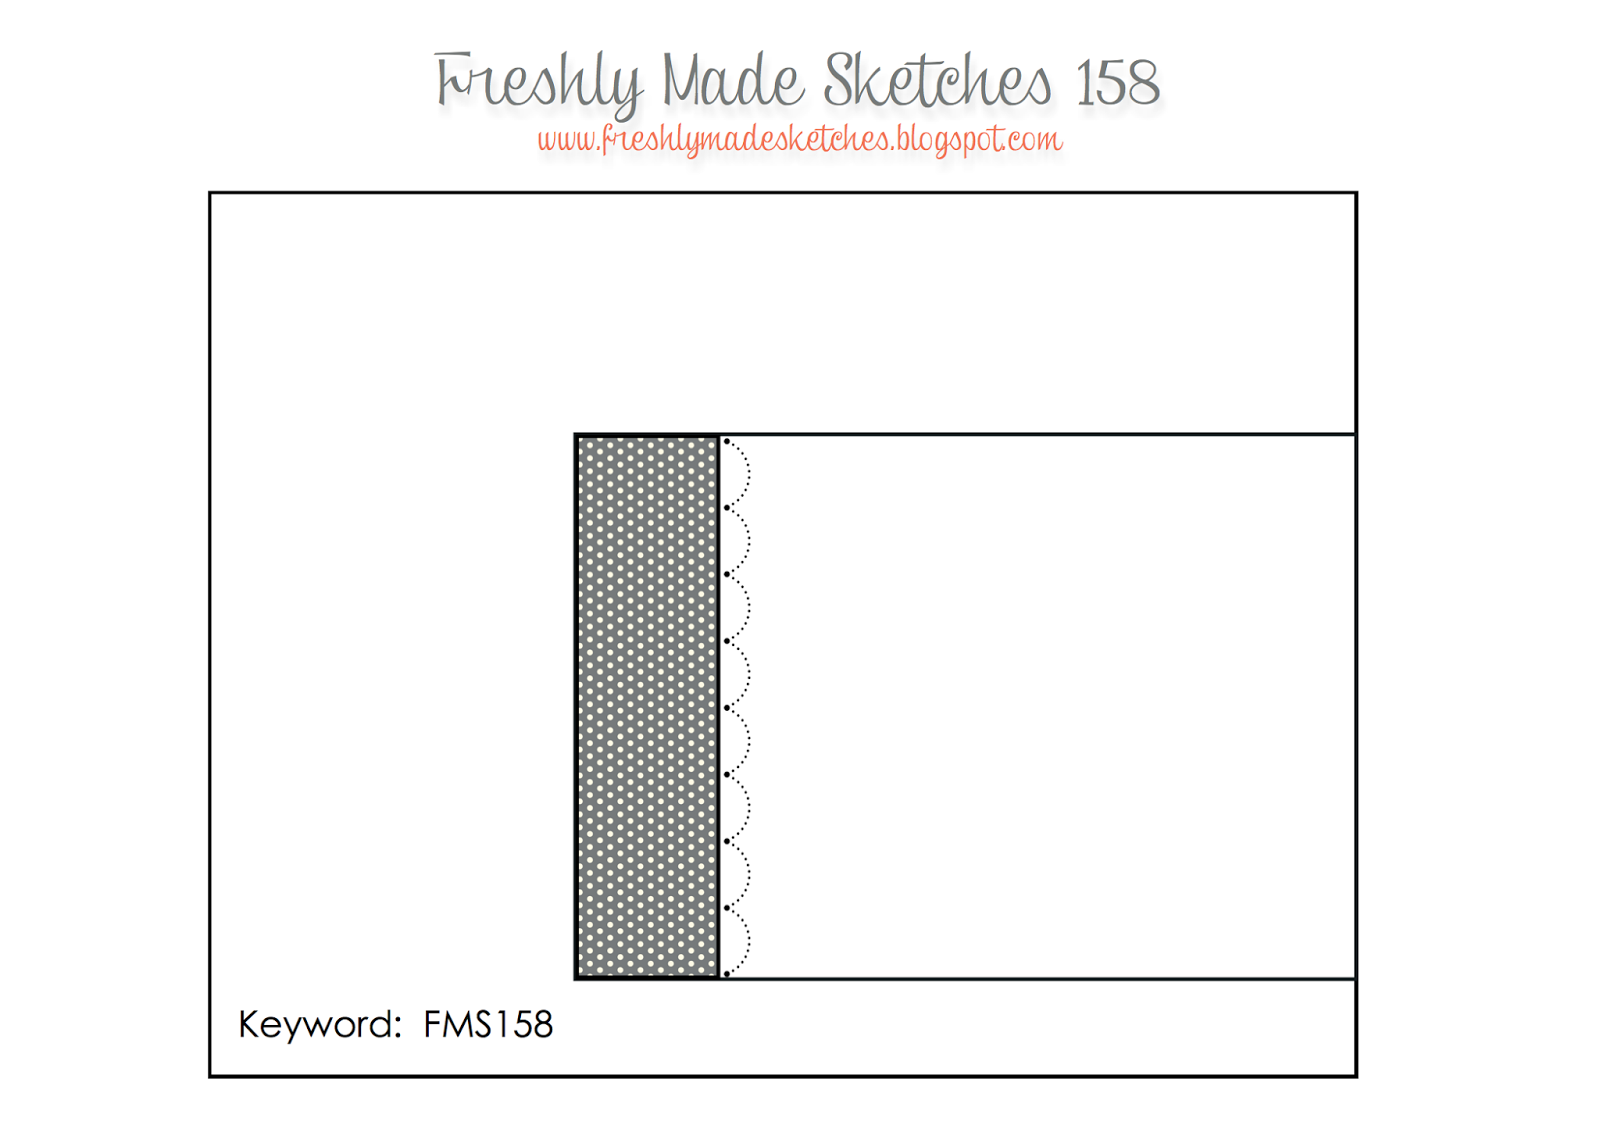
And now for some folksy holiday cards using this week's sketch at Freshly Made Sketches:
I'm also linking this to the Simon Monday Challenge (anything goes) and the Simon Wednesday Challenge (get crafty and use kraft).
Lastly, here is a photo of branch and flowering shrub/tree:
The flowers have a sweet fragrance.
Does anyone
know
what
this
is?
The scent immediately transports me back to Le Pouliguen, France where my aunt lived and I stayed with often. They were along the path I took from her home to the beach and I have THE most wonderful memories of being there. For the first time I caught this same scent when I was at the beach here in the US recently in Fenwick Island , DE staying with my friend Lynne. She and I were walking from her house to the walkway to get on the beach. It was a windy day. I just had to at least find out where this scent was coming from. So we walked around sticking our noses amongst various flowering shrubs along the way-and I FOUND IT!! I have not been able to find out what kind of plant this is. I may have to go to a landscaper when I get back there if nobody here can help me. I SO want one of these for my own backyard (if it will thrive there).
Thanks so much for your kind comments. I'll be visiting as many of you as I can over the next few days. Enjoy the weekend!
" There are no wrong turns, only unexpected paths." Mark Nepo
Deep in the Birches Abstract
In last Friday's post I mentioned getting over my fear of black. It wasn't so bad and now I find myself even drawn to working from a black background:) I began this journal page by painting black acrylic paint along with some Golden Paynes Gray and Permanent Violet Dark fluid acrylics. Several flat brushes were used with diluted grey and sand acrylic paints to drip and brush lines. I then scratched into the "trunks" to resemble the marks on a birch tree. You can click on it to get a larger view. Linking to Art Journal Every Day; Paint Party Friday; and Art Journal Journey (theme is "Deep in the Forest").
And now for some folksy holiday cards using this week's sketch at Freshly Made Sketches:
I got out my lg clear folder of Christmas themed materials and quickly got three cards done. They DO actually look nicer in person-it was difficult to get the right shots on a dark rainy day.
Products used: kraft note cards (Canvas Corp); patterned card stock (Basic Gray); signature Christmas 6 x 6 paper pad (My Minds Eye); adhesive chipboard (K and Company); felt die cuts (Hobby Lobby); vellum sticker -winter botanicals (Chartwell Studio Inc); sentiment banners- digi sheet (Paper Whimsy); Vintage Photo Distress ink (Ranger); red sewing thread.I'm also linking this to the Simon Monday Challenge (anything goes) and the Simon Wednesday Challenge (get crafty and use kraft).
Lastly, here is a photo of branch and flowering shrub/tree:
The flowers have a sweet fragrance.
Does anyone
know
what
this
is?
The scent immediately transports me back to Le Pouliguen, France where my aunt lived and I stayed with often. They were along the path I took from her home to the beach and I have THE most wonderful memories of being there. For the first time I caught this same scent when I was at the beach here in the US recently in Fenwick Island , DE staying with my friend Lynne. She and I were walking from her house to the walkway to get on the beach. It was a windy day. I just had to at least find out where this scent was coming from. So we walked around sticking our noses amongst various flowering shrubs along the way-and I FOUND IT!! I have not been able to find out what kind of plant this is. I may have to go to a landscaper when I get back there if nobody here can help me. I SO want one of these for my own backyard (if it will thrive there).
Thanks so much for your kind comments. I'll be visiting as many of you as I can over the next few days. Enjoy the weekend!
" There are no wrong turns, only unexpected paths." Mark Nepo
Tuesday, October 21, 2014
T(ea) Day!
Another week of challenges and link ups! I am happy to share with Bleubeard and Elizabeth today for T Stands for Tuesday. My tea of choice is an art project this week:
I had spotted my large bag of napkins in one of my art drawers and decided to play with them again. This is a 3" x 3" canvas that came with this cute little easel. I only paid $1 for the pkg. Part of the napkin was trimmed then glued to the canvas. I further enhanced the words with a gold gelli roll pen, some pencil lines to outline the cup and saucer, and some color and black marks with an XF Pitt pen. The edges were sponged with Vintage Photo Distress ink.
The actual beverage I'll share for Elizabeth and friends is raspberry limoncello sangria topped with champagne-YUM!!! We walked into town to meet our much younger friends at a favorite place Tapas on Main. We hadn't been there since June! Our very fave bartender Joe was there (he had been out awhile for a knee replacement), AND Lorenzo Branca was the entertainment for the evening! It was a FAB night-with lots of great music, fun, and laughter:
(l-r-Lynn, Andrew (who will be celebrating their 1st anniversary early next month), me, and Bill (who just celebrated our 31st). It is so wonderful to have so much in common with them-we always have a great time together-and it makes us NOT feel so old:):)
Our guy Joe-getting everyone all wound up.
The UBER talented Lorenzo-who not only plays MANY instruments and does all the singing, but is a very talented painter and sculptor. He will play anything from Elvis to Jethro Tull to Neil Diamond to John Legend and the latest artists.
For the Simon Monday challenge this week it's "anything goes". Since thanks to Joe I have Halloween on the brain I made a tag:
Products: formica chip sample (3 1/2" w x 5 " high-free at places like Home Depot or Lowes); silk leaf (Dollar Stores); image and sentiment (ARTchix Studio collage sheet); ribbon and paper were a gift; fibers from my stash; witches hat sticker ( Jolees); spider sticker (Michael's); Onyx black Versafine ink (Tsukineko).
And one final bit of art:
Sorry it looks a bit darker than it actually is. This is a journal page I created around the image of the pear on a napkin. The pg was painted with yellow ochre and micaceous iron oxide (Golden). The napkin piece was glued on along with a bit of torn upcycled dryer sheet (on the bottom edge of the napkin image). Une poire ( a pear) was computer generated and glued to the pg. I then layered lots of reinker glazes (see Serena Barton's fabulous book -Wabi Sabi Art Workshop)!. Once the pg was dry I sponged edges of the pg with Jet Black Staz- On ink.
Linking this to Inspiration Avenue-theme is " favorite artist-do something in the style of a favorite artist". Serena is the first person that came to mind because she has been SUCH an influence in my art since discovering her. I am also linking this to Mix it Monthly hosted by Piarom (Conny) for the theme of "Still Life".
" Be a full bucket, pulled up the dark way of a well, then lifted out into the light." Rumi
Friday, October 17, 2014
Answering Challenges
Still Life Bouquet
This bouquet goes to Kristin and EVA for hosting Paint Party Friday, and to all the contributing artists. Since discovering their PPF blog and meeting with so many talented souls each week I have seen my art grow as I continue to be inspired. I have become much more relaxed in my own artistic skin and take away a hunger to create even more after visiting everyone. I have connected with challenges and artists I most likely wouldn't have gotten to know if it wasn't for PPF. A heartfelt thank you to everyone!
Still Life Bouquet represents tackling my fear of working on a black or very dark background. Here is how it evolved:
OK, I tell myself to take a deep breath (or two), get out the black paint and some mark making tools, and let go of the fear!
The photo here looks a bit lighter than it actually was. I applied a fairly thick coat of black paint then did some mark making. Once it dried I did some scratching into the surface (sgraffito). Now what? I really thought this page would sit like this in my journal a long time- either that or get covered up. A few days later however inspiration struck! At Mix It Monthly , Piarom's (Conny) challenge this month is "still life" and I knew I wanted to do a vase of flowers on a table. With still a nice pile of vibrantly painted gelli prints nearby I got started. The vase, table and large flowers are all printed papers. The little white flowers and stems were painted in afterwards. I had let my fear go, and out emerged a page I am so proud of!
So, how about you? How do you conquer your artistic fears? And have you been pleasantly surprised by the outcome?
Linking to Paint Party Friday, Mix It Monthly, Art Journal Every Day.
Another monthly challenge I have discovered through PPF is Art Journal Journey with Susi. Her many art pages for each of the monthly challenges are so varied- and gorgeous!! The theme this month is "Deep in The Forest" and here is my first contribution:
And here's my card:
I flipped the sketch around to make my card. Products: patterned paper (Stampington and Company); patterned card (DCWV); orange card stock; cat image, October 31 and black German border (ARTchix Studio); stamp image (Giga Guidelines UM set-Papertrey Ink); Versafine Onyx Black ink(Tsukineko); buttons, embroidery threads from my stash; sentiment -computer generated.
I'm also linking this to the Simon Wednesday Challenge Blog (theme this week is Color Coordinates-black, slate, orange, green apple and lavender).
Thanks so much for stopping by!
How about I give YOU a challenge now?
Choose a fear you have about creating-
whether it's a medium, a color, a style, etc.
and let go of that fear!
Just try it!
Play!
And be pleasantly surprised!
" Feel the fear and do it anyway." Susan Jeffers
This bouquet goes to Kristin and EVA for hosting Paint Party Friday, and to all the contributing artists. Since discovering their PPF blog and meeting with so many talented souls each week I have seen my art grow as I continue to be inspired. I have become much more relaxed in my own artistic skin and take away a hunger to create even more after visiting everyone. I have connected with challenges and artists I most likely wouldn't have gotten to know if it wasn't for PPF. A heartfelt thank you to everyone!
Still Life Bouquet represents tackling my fear of working on a black or very dark background. Here is how it evolved:
OK, I tell myself to take a deep breath (or two), get out the black paint and some mark making tools, and let go of the fear!
The photo here looks a bit lighter than it actually was. I applied a fairly thick coat of black paint then did some mark making. Once it dried I did some scratching into the surface (sgraffito). Now what? I really thought this page would sit like this in my journal a long time- either that or get covered up. A few days later however inspiration struck! At Mix It Monthly , Piarom's (Conny) challenge this month is "still life" and I knew I wanted to do a vase of flowers on a table. With still a nice pile of vibrantly painted gelli prints nearby I got started. The vase, table and large flowers are all printed papers. The little white flowers and stems were painted in afterwards. I had let my fear go, and out emerged a page I am so proud of!
So, how about you? How do you conquer your artistic fears? And have you been pleasantly surprised by the outcome?
Linking to Paint Party Friday, Mix It Monthly, Art Journal Every Day.
Another monthly challenge I have discovered through PPF is Art Journal Journey with Susi. Her many art pages for each of the monthly challenges are so varied- and gorgeous!! The theme this month is "Deep in The Forest" and here is my first contribution:
The page already had some mopped up green and pink spray ink on it. I saw the trees and used a fan brush along with some green acrylics and Payne's Gray (another dark color that scares me) and just tapped the loaded brush for the shapes. Once dry I painted on trunks . The words were added digitally.
And now for a completely different art project! Freshly Made Sketches is a wonderful blog that features a new card sketch each week and shares fresh and clean cards created by the design team to inspire. This week's sketch was created by Jen T:
I flipped the sketch around to make my card. Products: patterned paper (Stampington and Company); patterned card (DCWV); orange card stock; cat image, October 31 and black German border (ARTchix Studio); stamp image (Giga Guidelines UM set-Papertrey Ink); Versafine Onyx Black ink(Tsukineko); buttons, embroidery threads from my stash; sentiment -computer generated.
I'm also linking this to the Simon Wednesday Challenge Blog (theme this week is Color Coordinates-black, slate, orange, green apple and lavender).
Thanks so much for stopping by!
How about I give YOU a challenge now?
Choose a fear you have about creating-
whether it's a medium, a color, a style, etc.
and let go of that fear!
Just try it!
Play!
And be pleasantly surprised!
" Feel the fear and do it anyway." Susan Jeffers
Monday, October 13, 2014
Change
I began thinking about the word "change" as I see the season of summer changing to autumn, I'm putting away the summer wardrobe and "changing" to fall/winter clothes. The produce in the markets are reflecting the "change" of seasons as is the choice of foods I am now preparing(hint,hint-recipe coming at end of post). And all that kept repeating in my thoughts was the Mahatma Gandhi quote- "be the change you wish to see in the world". So I took out my journal and created a page around it. The background was made by watering down some blue acrylic paint and covering the page. I used a plastic stencil of circles and wiped off some of the color in areas with a baby wipe. Yellow acrylic paint was used to add two flowers using the Flower Blossoms stencil (Joggles.com). A circle gelli plate print was then glued down. Heart punch out was added along with sticker sentiments/words (Cosmo Cricket). Words were stamped on the side using Onyx Black VersaFine ink (Tsukineko) and Superstar alphabet (Scrappy Cat). Linking to the Simon Monday Challenge "O is for..." the circle shapes I used.
And yet a part of me is still at the beach. So, for my friends (who I have missed) at Bleubeard and Elizabeth's T Stands For Tuesday here is a photo of a typical breakfast we had each morning in Cape May:
Too much to eat for me so Bill helped me out with some of it, and I saved some of the toast to share with some beach friends (hopefully this will work):
I have now taken down the hummingbird feeder at home but was able to capture a photo of the antics of a chickadee determined to get some of that sugar water (which he did):
And now for the first fall inspired soup I made so far:
Italian Kitchen Soup
This is a recipe from Wegman's. It has an excellent flavor and is a healthy vegetable soup. After making it the first time I have made a few changes in the following recipe. It does make a LOT of soup-good for a big group or for freezing. Enjoy!
Looking forward to catching up with everyone! PS- if you're interested in Pt. 3 of my Gelli Plate print techniques and projects see my previous post:)
" I alone cannot change the world, but I can cast a stone across the waters that makes many ripples."
Mother Teresa
Italian Kitchen Soup
1 Tbsp. olive oil 2 cups of a mix of lg. chopped celery, onion and carrots (mirepoix)
1/4 tsp. salt 8 oz. cleaned and cut kale greens 1 small zucchini, cut into 1/2 " dice
3 tsp. herbes de Provence 2 14.5 oz cans diced tomatoes in jc.
1 15.5 oz can garbanzo beans, drained 2 32 oz cartons of vegetable broth
salt and pepper to taste shredded parmesan cheese for garnish
Heat oil, mirepoix and salt in a stockpot on Med-Low. Cook, stirring 10-15min. until veggies soften. Add kale, stirring 5 - 8 min. to wilt. Add zucchini, cook stirring 3 min. to soften. Add herbs, tomatoes, garbanzo beans and broth; bring to a simmer. Simmer until desired doneness of kale greens. Season to taste with salt and pepper. Serve in a bowl . Garnish with the cheese. Note-if you want a heartier soup , add some pasta or potatoes.
Thursday, October 9, 2014
Gelli Plate Art Pt. 3
Been awhile since my last post. So how is everyone?? We got in yet more beach time-this time we went here:
We are blessed to have our good long time friends invite us so often:)
this is actually the back of a ghost crab but
doesn't it look like a face?? I spotted this creature while walking along the path to the beach.
And this is the front view. He looks like he's
smiling. Fascinating to watch. First time I'd seen one.
And now for the art part. First up is my calendar spread for October:
And all prettied up with color! Again, this calendar was prompted by JoAnne Sharpe's Draw Your Awesome Year online class. I hear she's working on a new one for 2015:):) I am linking this to Inspiration Avenue (October colors theme) the Simon Wednesday Challenge blog (use watercolors), and Kate Cranes Calendar Project. I used both Peerless watercolors and water based markers.
This is the final part in my gelli print play series of techniques. You can see part 1 here and part 2 here. For this final chapter I have chosen to share a variety of projects using up those prints I made in the first two series. These are all pretty quick and easy to complete.
So, gather your gelli prints, along with some background stamps and ink pads to further embellish your papers and let's play!
1. Make cards!
2. Make inspiration cards or ATCs
3. Cover a plain ole composition book!
This is a mini comp book and I used the thinner deli print for the covers. Wouldn't these make great stocking stuffers?? And speaking of... how about making...
4. Ornaments!
These are direct prints from a plastic template I used on the plate. Read more here. I added some stamping, sewing and a sentiment sticker. Embroidery floss was used for the hanger.
You can also find many fun templates to play with just by googling the word.
This template is from Stampington and Company-Stamper's Sampler Tempting Templates. Or you can make your own as I did here:
Notice I made my ornaments flat so they could be slipped into a card and not require extra postage:)
5. Frame it !
This was actually a small leftover scrap and I just loved the pattern so I added a bit of red stamping, mounted it to dark card stock and framed it! Who says a gelli print can't be a masterpiece? :)
And finally here are some WIP journal pages using the ends of papers I had to cut down a bit:
I simply laid them out in the order I wanted them (these are deli paper prints) then glued them up against each other using Collage Pauge.
On this page I glued down a thin paper print first. Then I cut in half one of my circle prints (see how I made my own circle template for printing here) and glued it on the side.
I chose not to write out details and product info for these projects so my post wouldn't be super long. So please, contact me if you have any further questions, I'd be more than happy to help. I hope this has inspired you to take out that plate, make LOTS of papers- and USE THEM so you can make more!
Linking this part to Art Journal Every Day and Paint Party Friday. I'm looking forward to catching up with everyone!
" Every leaf speaks to me, fluttering from the autumn tree." Emily Bronte
Subscribe to:
Posts (Atom)