Thursday, May 31, 2012

Working With Chevrons

   I hope you all had a lovely Memorial Day weekend. It was more like the Fourth of July here-very hot and humid-so much so that we put the AC on! Of course, this kind of heat brought out numerous thunderstorms so my computer was shut down for the most part. That allowed me more art time and reading time so it was a good thing-and I do LOVE a good thunderstorm - so long as noone gets hurt.

  I have watched the next two video lessons  and am still having a great time with Julie Balzer's online stamp carving class! Lessons 3 and 4 are about carving chevron designs. I have completed my stamp and tags for Lesson 3 and even carved my stamps from Lesson 4 but I'm not quite finished with my work on Lesson 4 yet so I'll save that for another post.

 Each lesson is a bit more challenging but Julie's videos are filled with such incredible detail that it truly is just a matter of practice, practice, practice! You can read more about it and follow the progress beginning with this post. The best part is that I'm taking it along with my friend Lenna. We're committed to learning together and creating a collaborative project at the same time. I highly recommend it-it's such a great incentive to keep going!

  Here is the start of my lesson 3 class:


   It began with creating a design on paper before doing it on the speedy carve block. Once I was happy with it I began to carve, making many test prints along the way. Here is my first test print:
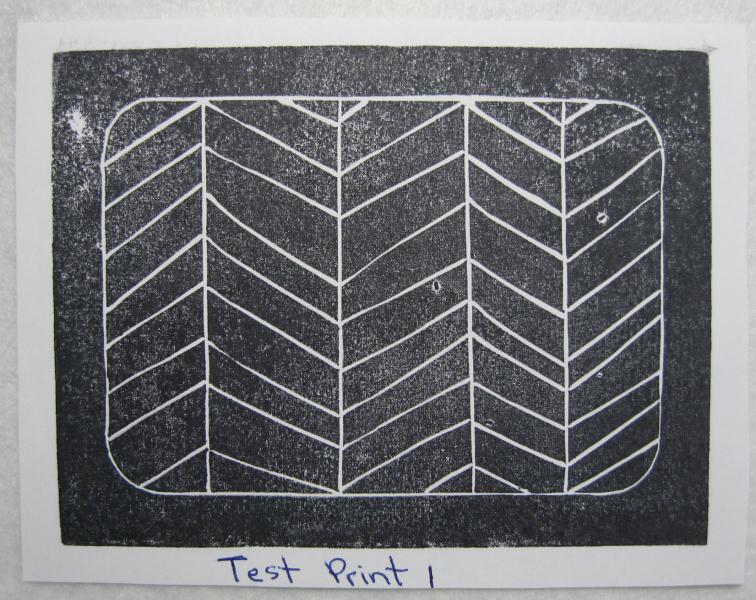


  OK, looks pretty good so now it's time to carve a pattern within the spaces....along with more test printing:


   I was thinking about carving little dots or xs around the border so I drew them on the paper with a white pen to see how they'd look. I liked them .....but I chickened out and decided that instead of carving I'd just add marker or pen to the stamped image if I wanted it. Yes, I allowed the fear of making a big mistake and ruining my stamp after all the work I already put into it to take over. It's something I'll always be working on I think :)


  Here is the base of the tags-one for Lenna and one for me, along with my finished carved stamp:


   I used a  Kaleidacolor rainbow inkpad in Fresh Greens and repeatedly stamped to fill the tags.

   And here are the finished tags:


   I stamped a quote (an old PSX image) on a white cardstock panel and sewed 3 heart buttons below it. I then stamped my chevron carving on white cardstock with another Kaleidacolor rainbow inkpad in Blue Breeze. I used my Grand Calibur die cutting machine to cut away a window. I drew in the black dots with a black marker and thne attached it to the tag with foam adhesive to give it the dimension and look of a shadow box. It was finished with some fibers and ribbons, and a turquoise dresden border.

  If you've ever had the urge to carve your own stamps and/or take an online class please check out Julie's class-it really is the best thing I have done so far this year! Oh, and don't forget to take a friend along to play :)

                    " You can't use up creativity. The more you use, the more you have."
                                                                                               Maya Angelou

Saturday, May 26, 2012

Stamp Carving Progress and Journal Play

   I have been having just too much fun lately with my Stamp Carving 101 class and tag making along with it for a swap I'm doing with Lenna Andrews. You can visit her wonderful blog and see the tags she made for me from Lesson 2 here

   This is the stamp set I carved from Lesson 2 about interlocking stamps and the base I started with for my tags:


   I began by puting a light coat of gesso on my stamps and randomly stamping around the tags. (Tip: anytime you're using acrylic paint, gesso or modeling paste on a stamp be sure to have a container of water at hand because you need to clean it off immediately.) Once the gesso was dry, I sprayed yellow spray ink over the tag slightly wiping some off where the gessoed stripes are. I then repeated that with a red spray ink.


   And these are the finished tags:


   I used Jet Black Staz-On ink to stamp with my newly carved stamp at the top. Along the sides I used Staz-On Pumpkin and Azure and repeatedly stamped in a haphazard manner. The stamp at the bottom is from the Bordering on the Edge Dylusions stamp set.  To me this had a very Southwestern or tribal feel to it so I chose a Native American quote to go with it. Lenna and I both have a love for quotes so for each lesson's tags I do I'm going to simply add a quote to allow for the carved stamps to be the focus.

   Then I finished another journal spread for Art Journal Everyday this week. Here is the background I began with:


  I started by using an old credit card to randomly swipe some gesso over the pages. Once dry, I sponged a variety of Distress inks to cover the pages, then took a baby wipe to remove some of the ink over the gessoed areas. This technique for gesso came from a link on Julie Balzer's blog to Traci Bunker's blog. I then used Julie's lotus blossom stencil on the lower right corner, a Dylusions stencil on the left pg with some black acrylic paint and stamps from two Dylusions sets:Bordering on the Edge and In Betweenies on the upper right page.


  This is the finished spread:


     I had taken this journal along with me when I went to my friend LuAnn's house earlier this week to play with her new Dylusion stamps and inks so I stamped a few images on the pages. I finished it the other day by using my Caran D'Ache Watercolor crayons along with a red and a white uni-ball pen (Signo) in places for some added color. I used a favorite Helen Keller quote- "My friends have made the story of my life. In a thousand ways they have turned my limitations into beautiful privileges, and enabled me to walk serene and happy in the shadow cast by my deprivation."

   Off to get some housework done so I can relax and carve my next lesson's stamp. Wish me luck-this one's going to be much more detailed :)

  
                       " The cave you fear to enter holds the treasure you seek."
                                                                                         Joseph Campbell


Wednesday, May 23, 2012

Let's Play Tag and Get Dylusional!

    It's Wednesday and so I chose today to take a day off from tackling my frogs. I have been diligent about it since creating the journal spread and posting about it here. It really is therapeutic and energizing for sure- the more I tackle, the more I want to go thru and clean!

   On Monday, I went to my friend LuAnn's home to play with her new Dylusion ink sprays, stamps and stencils which you can purchase here. I brought along my take-along journal, tags, Inkadinkado spray inks and my favorite Balzer Design stencils. Man, did we go "dylusional"!! We spritzed and sprayed and sprayed and stamped and sprayed and stencilled on tags, on cardstock, on journal pages like there was no tomorrow!!  After we finally wore ourselves out and cleaned up, our hands (especially mine!) were pretty much covered with every color we used!! Good thing I didn't have to go out anywhere anytime soon :). I regret that I forgot my camera though :(

   Most of what we did went unfinished as backgrounds to add to, but I did manage to complete two tags:


   I used several spray inks for the background, along with Balzer Designs pomegranite stencil (which I LOVE!!!). On the left tag at the top I used my newly hand carved stamps(more on that after this) and on both tags used stamp images from at least several sets from the Dylusion line. I have to say too, that after using both the Inkadinkado spray inks and the Dylusion spray inks that there is no comparison-the Dylusion colors are the MOST vibrant and luscious colors one could ever hope for!!! Thank you so much LuAnn for a totally FUN day!!!

   I had mentioned in a previous post  that I'm taking a stamp carving class by Julie Balzer along with my friend Lenna.(Just click on the word "post" above and you can get more links there). We are creating tags for each other using our carved stamps. Lenna has finished her tags for our first lesson and you can see them here.  My tags for Lenna and I:


   I used acrylic paints and the pomegranite stencil for the background, stamped sentiment (Hero Arts) and heart with Jet Black Staz-On ink then drew the strings and ribbon and colored the balloon hearts in with watercolor crayons.

 There's a good chance of a thunderstorm or two so I think I'll go to my craft room and make the tags from my Lesson 2 stamps and start going thru my fabrics for an upcoming prayer flag Garden theme swap!

  Thank you for your lovely comments. I so appreciate your support.

                     Celebrate the happiness that friends are always giving;
                   make every day a holiday and celebrate just living!  
                                                                                    Amanda Bradley


Sunday, May 20, 2012

Bright Bite, Stamp Carving AND Art Journal Everyday!!

   I hope you all enjoyed a beautiful Spring weekend as we have here in NE PA! I managed to tackle some "frogs", get some sun, take an online class lesson and make a card for Trigger Tuesday!

  First up is a post combining my first "Stamp Carving 101" lesson thru Julie Balzer along with her "Art Journal Everyday" project. You can click on the badges on the sidebar on the right. This is my first online class and I cannot tell you how wonderful it is-and I 've only just begun!!!! Julie is an incredible, detailed and informative teacher and I can honestly say I would trust any class she offers to give me that same attention. Yes there are freebie videos all over the internet but, honestly, they just don't compare. On a side note, my talented artist friend Lenna Andrews is taking it "with" me and she graciously agreed to my proposal of creating tags for each other showcasing our carved stamps from the lessons. It is sure to be a wonderfully creative tag book of our class!

  Here is my entry for Art Journal Everyday showcasing my very first hand carved stamp - a heart:


  I used Dylusion stencils (see sidebar badge)  in the background with acrylic paints. At the top is washi tape . I played around to see what things I could come up with  for my newly carved stamp and after playing around I colored some things in with watercolor crayons.


And now , my Tuesday Trigger card for this week at  Moxie Fab World.

Here is the DELISH trigger:


And this is the card I came up with:


   I wanted to capture the vibrant colors and delicateness of the cookies so I made tissue paper posies 
was thrilled to find the perfect colored tissue papers in my stash!
Here is a side view to show the layers I "popped" with foam adhesive dots:


   I'm quite happy with the result. Products used: white cardstock, tissue papers, Grand Calibur die cut machine along with Labels Eight  and Big Scalloped Circles Lg. dies (Spellbinders), rubber   stamp sentiment (Impression Obsession), colored brads, dye ink (Vivid!-Pink).                             

PS- Did anyone notice that on the pink posie I used a heart shaped brad?
Thank you taking a peek. I do love hearing from you and seeing what you have to share too.

"Art makes the world go 'round. Keep me spinning."
                                         Linda Kunsman

Saturday, May 12, 2012

Eat That Frog!

   Back for my second post today and this one is for Art Journal Everyday.

 My pages are about procrastination and decluttering. The excerpt I typed up on the right page is from a book titled "Eat That Frog" published by Simple Truths. These books were introduced to my husband and I by friends and we now have our own little collection of inspirations. They are short, quick reads which get to the point and many of them include a short CD with accompanying sweet music, photos and sayings.


   Eating the frog is about tackling the biggest tasks head on, first thing during your day. After reading The Oprah magazine for March (De-Clutter Your Life was the running theme) I realized what a sentimental clutterer I am-and if you're reading this my dear hubby-yes,you are too (just not to the extent that I am)! I needed to finish my above pages and begin tackling my frogs-one cabinet, one area, one closet at a time. I have already begun and hope to do get to at least a little each day.

  So I'm done for today. Heading downtown to a Mother's Day sidewalk art show. Wishing all mothers out there a beautiful and blessed Sunday.

  "Everyone you meet comes with baggage. Find someone who loves you enough to help you unpack."
Thank you Bill, XO